Introduction
For our Annual Club night, I made a light (70g) payload capable of transmitting weather data down to a ground station. Take a look inside for the code, circuitry, construction, and results! Code available here.

The Basics
Essentially, I use an Arduino Mini to report weather data down to a receiving station. Here are my parts:
- Microcontroller - Arduino Pro Mini 3.3V
- Temperature Sensor - MPL3115A2
- Radio - nRF24L01
- Receiver Groundstation - Arduino Uno
- Receiver LCD - LCD Shield
The arduino processes information from the Temperature sensor, formats it into an ASCII packet, then transmits it to the groundstation via the bluetooth radio. The entire circuit runs on 3.3 volts and is extremely portable.
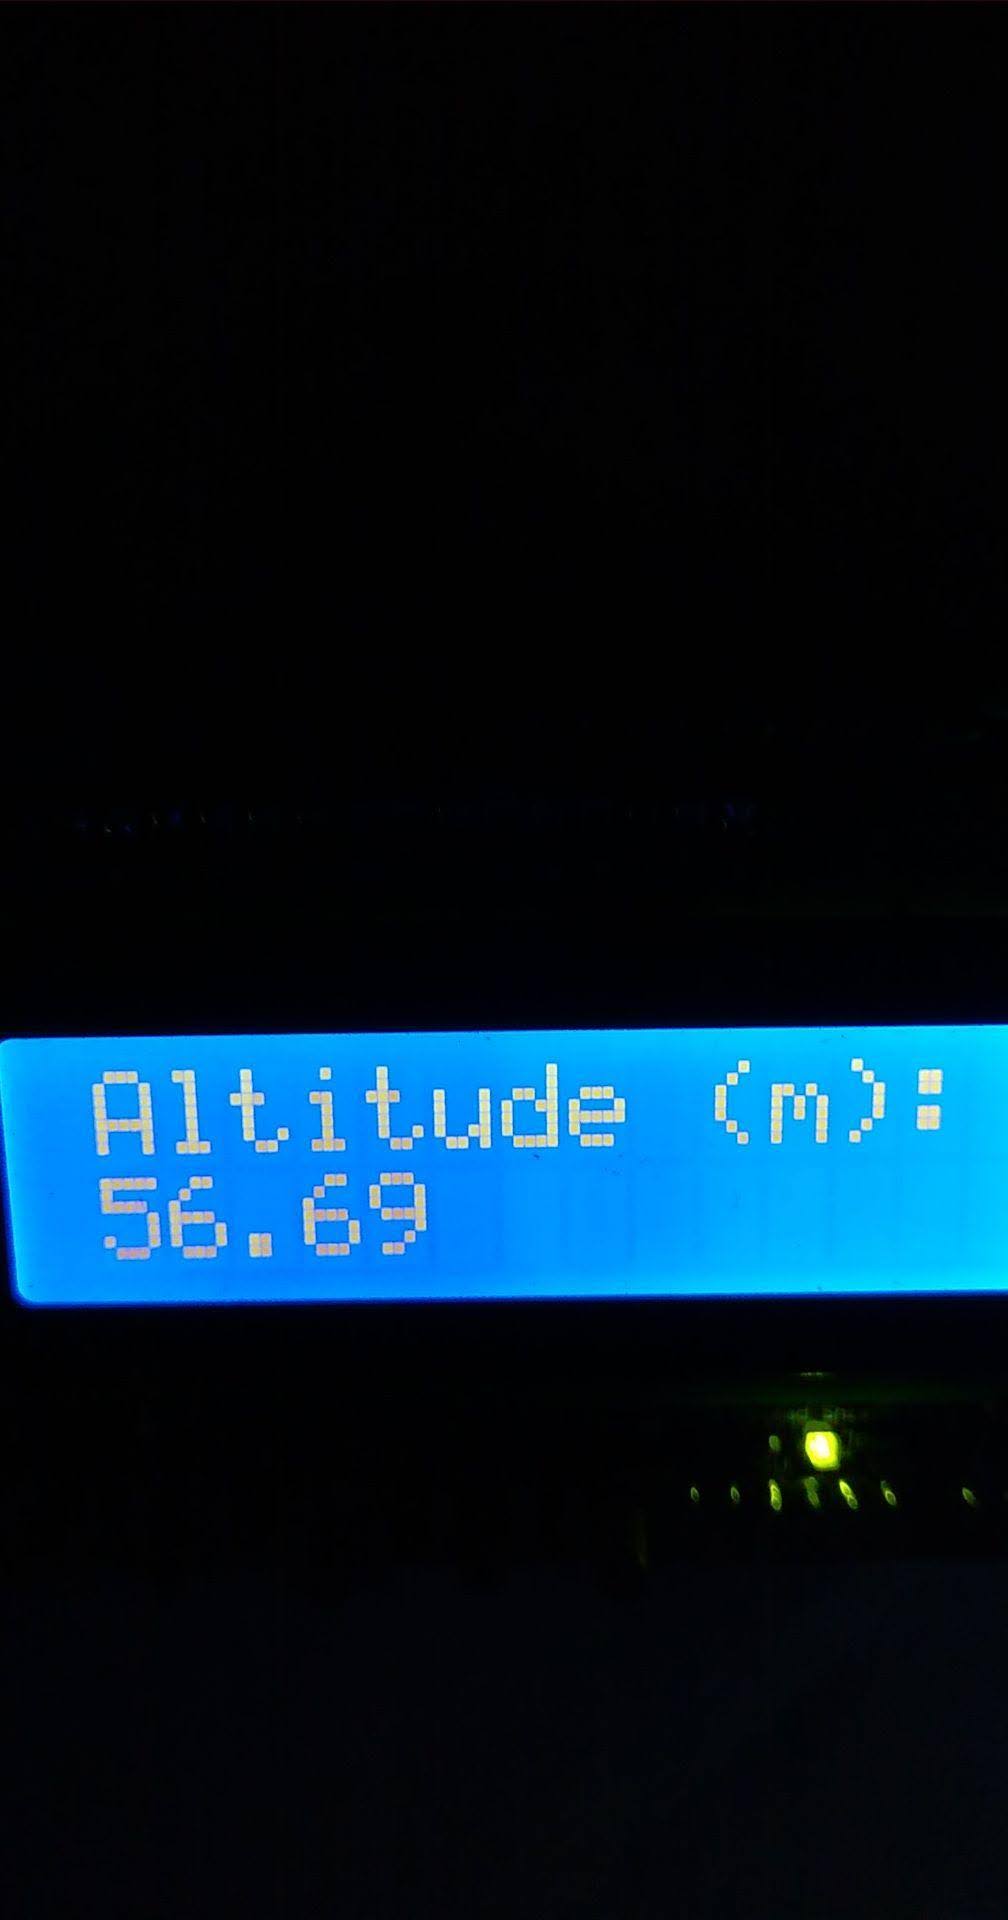
The groundstation receives the ASCII packet from above and displays it on a formatted LCD:
The Code
If you go into my code, you’ll see several files. It is semi-modular and easy to change for different applications.
Transmit Module
First, transmit.ino grabs data from the temperature sensor and feeds it to the nRF radio module.
Here’s the pinout for the nRF:
- MISO connects to pin 12 of the Uno
- MOSI connects to pin 11 of the Uno
- SCK connects to pin 13 of the Uno
- CE connects to pin 9 of the Uno
- CSN connects to pin 10 of the Uno
- GND and VCC of the NRF24L01 are connected to GND and 3.3V of the Nano
- SDA - A4
- SCL - A5
- TMP36 - A0, VCC, GND
Some setup steps are required for the radio:
RF24 radio(9, 8);  // CE, CSN
const byte address[6] = "00001";

void setup()
{
  radio.begin();

  //set the address
  radio.openWritingPipe(address);
  radio.stopListening();
  Serial.begin(9600);

}
But sending data is easy if you know how to play with strings in C. Essentially, I fit the float reading onto a predefined string and send it out.
float altm = baro.getAltitude();
 char altmchar[10];
 dtostrf(altm,4,2,altmchar);
 char altmreading[32];
 sprintf(altmreading, "Altitude (m): %s\n", altmchar);
 Serial.println(altmreading);
 radio.write(&altmreading, sizeof(altmreading));
All set! The code also has support for other modules that didn’t make the cut (the TMP36 temperature sensor, for example).
The Receiver
Receiving just the radio data is simple as long as you only care about strings. Here are the necessary setup steps:
void setup()
{
  while (!Serial);
    Serial.begin(9600);

  radio.begin();

  //set the address
  radio.openReadingPipe(0, address);

  //Set module as receiver
  radio.startListening();
}
And to loop:
if (radio.available())
  {
    char text[32] = {0};
    radio.read(&text, sizeof(text)); //could potentially be an issue where multiple transmissions are picked up
    Serial.println(text);
    delay(250);
  }
Receive with LCD
If you want to receive with a 16x2 LCD, you will need to decide when to start the string on the second line. I chose the colon: because I formatted my strings in transmit to say NAME: VALUE, I can split the string at the colon and move it to the second line. The following code accomplishes
if (radio.available()) //check if you're receiving
  {
    lcd.clear(); //clear for new packets
    char text[32] = {0}; //set up blank text char
    radio.read(&text, sizeof(text)); //could potentially be an issue where multiple transmissions are picked up
    Serial.println(text);
    lcd.setCursor(0, 0);
     //print essentially the first 16 characters on the first row of the LCD display
   if (sizeof(text) > 15) //if it doesn't fit
   {
    bool DisplayFlag = false; //whether or not you have reached row 2 of the display
    byte colcounter = 0; //character count after the colon
    for (byte i = 0; i < sizeof(text); i = i + 1) {
      if ((DisplayFlag == true) && ((isDigit(text[i]) == true) || (text[i] == '.')))//put only numbers (not garbage) on the bottom
      {
        lcd.setCursor(colcounter,1);
        lcd.print(text[i]);
        colcounter++;
      }
      else
      {
        lcd.setCursor(i,0);
        lcd.print(text[i]);
      }
      if (text[i] == ':')
      {
        DisplayFlag = true; //set it once and continue using it
      }
    }
    }
    else
   {
    lcd.print(text);
   }
  }
The code works pretty well to report data evenly on the display. However, negative signs (not that they should occur) are placed on the first row. You could theoretically get a negative temperature, but I have little need to code this in.
The Construction
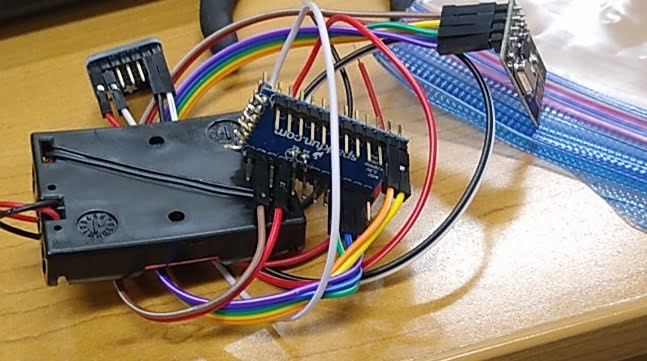
I took inspiration from Bob Bruninga WB4APR to construct my payload. First I soldered everything onto an Arduino Pro Mini with some 1.5V batteries and a voltage regulator to evenly generate 3.3v:
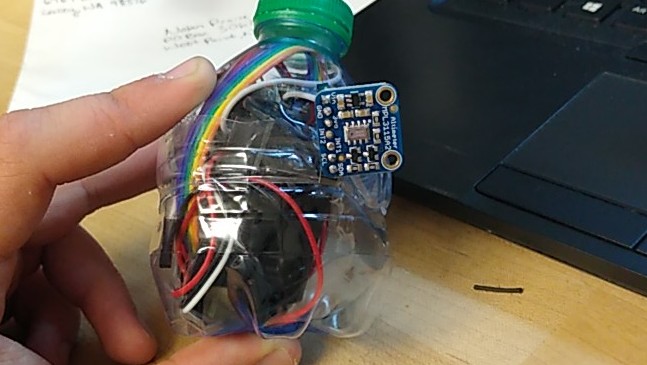
After initial verification from the ground station, I put this in its payload. I just cut a mini water bottle in half and tied the ends together with kite string:
Of course, I was wasting energy using a voltage regulator instead of a specialized battery. But weight is good and comparable to any 3.3V lithium-ion cylindrical battery. In the future, maybe using a LiPO pack or a 3.3V coin cell would work better. I only need it to run for about 4 hours max.
The Launch
My calculations on this site (and others) told me each helium-latex balloon can lift about 14-15 grams. So my payload weighing in at 68g would be fine by 5 or so balloons… this was not the case. Take a look at the station in flight:
 “5” Balloons…
It took more like 20-30. Which was fine, since we had the helium for it. I wonder how that will translate to our actual upcoming tethered launch…
Some more pictures:
 A far-away view of the payload
The Future
Overall this project was a great success in creating a highly visible, fun advertisement for the Astronomy and Amateur Radio Clubs at West Point. In the future I would make the payload a little lighter as its battery was easily 2/3 of the total weight.
This project was a feeder for my upcoming “BalloonSat Suite” shown with my TNC, release mechanism, and Data Logger. Each of these modules use the famed nRF24L01 bluetooth module to communicate with each other. My vision is that each of these devices are separated by 20+ ft of flight string on the balloon and need to low-power communicate with each other. The central TNC receives all these messages and formats it into APRS Telemetry for groundstations to receive. I am able to greatly reduce my power while still viewing all pertinent information.
Overall, a great success!