Weather Balloon: SSTV Beacon
Welcome back! I took quite a hiatus from the blog to work finish up all my projects from the semester. Slowly but surely I will keep cranking them out. I’ll start first on my SSTV beacon that we put in the USMA Weather balloon on 24 April. Strap in!
Theory / Background
Slow-Scan Television is a radio modulation scheme I’ve been obsessed with, as shown in my previous posts. Almost like a fax machine, it takes an image and modulates it line-by-line to create a radio signal sounding not unlike a kindergarten recorder symphony.

From here, different modulation schemes arise. I decided to go with Robot36 for its widespread availability. Below is the code for Robot36:

I actually had an incredibly difficult time getting this to sync properly on the transmit end even in MATLAB. I recommend if you have an image you want to transmit, use this online resource with audacity to encode your waveform and save as .mp3.
Configuration
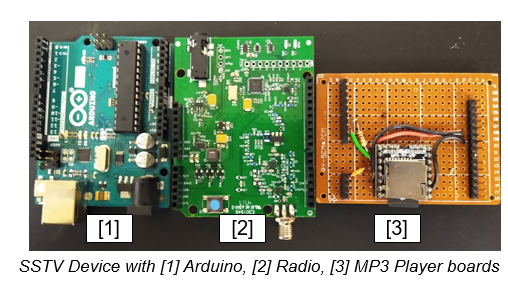
There are two distinct ways I tried to tackle this problem. My constants in the equation were equipment - I knew my radio transmitter would be a Hamshield or Hamshield Mini. Not my favorite devices (and I will be migrating to the DRA818V soon), but I have quite a few of them lying around.
First, you could try by programming the radio’s C code bit-by-bit. You form a hexadecimal matrix and modulate each bit using loops. It mimics my matlab attempt shown above. We almost got this to work in this repository, but the hamshield does not operate fast enough for milliseconds of transmission. No matter what we did, either speed or size severely limited our ability. Not to worry, there is another solution.

Enter: The DFPlayer Mini
We ended up using this device as a storage source for the SSTV signal. We pre-modulated and saved the waveform, so we only needed to transmit the file. At the cost of size and power, we were able to reliably get the transmission we wanted. Follow the code and libraries here - name the file “1.” Use the following configuration:
- VCC - 5V; GND - GND.
- RX - Arduino Pin 11 with a 1k resistor
- TX - Arduino Pin 10
- DAC_R - Hamshield “Mic” pin, normally connected to Arduino pin 3. The Hamshield Mini did not support this.
We actually made it into a shield using some available perfboard. It fits snugly on top of the hamshield and arduino.
Unfortunately, you have to use a 9V power source through the barrel jack instead of 5V. However, we were in spades of available power on the board. The device still consumed a nominal amount of current - 80 mA - so we were not incredibly worried about running out of battery on the HAB.
Results
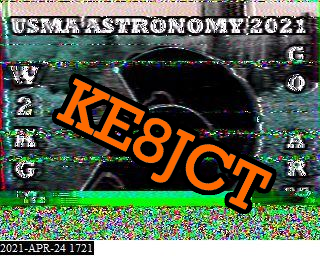
We set the frequency to an experimental amateur 2m portion for optimal propagation and to mimic the ISS as much as possible. When I first installed the module, I imagined that would be the last I heard it. However, it transmitted exceptionally well. We released the balloon and continued to hear it, well into 80,000ft!
The SSTV beacon was also a great opportunity for local hams to participate in our launch from afar. Steve K2GOG and Darby KB2RWW both received the signal at their own locations with near-perfect transmission. The cut-off happened due to an error in my script; please examine the delay() function before you send it off!


Conclusion
I designed and built an SSTV transmitter for our High-Altitude balloon project that transmitted a pre-recorded .mp3 file exceptionally well and involved members of the local ham community.
For the future, we want to timestamp and transmit actual live images from a raspberry pi. You may see an image just like the one below appear on 146.565 MHz!
